
Introduction
Translating blog posts is crucial for expanding your reach and engaging with a global audience. By breaking down language barriers, you can share your message with readers who speak Ukrainian.
Whether you aim to translate a single blog post or your entire blog, Doctranslate offers a powerful and user-friendly solution.
With Doctranslate, translating your blog post from English to Ukrainian becomes a seamless process. This guide will show you how to easily translate your blog content, ensuring accuracy and efficiency.
Follow these steps to translate your blog post and connect with a wider audience using Doctranslate.
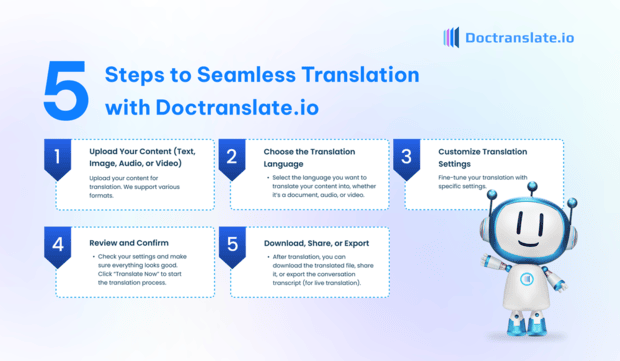
Step-by-Step Guide: Translating Blog Post from English to Ukrainian with Doctranslate.io
Step 1: Upload Your Content
To begin, you need to upload your blog post to Doctranslate. This is a simple and straightforward process.
You can easily upload your blog post document in various formats.
- For documents, Translate Document feature supports formats like .DOCX and .PDF.
Simply click on the ‘Upload’ button on the Doctranslate website.
Select the blog post file from your computer to upload it to the platform and prepare it for translation.
Step 2: Choose the Translation Language
After uploading your blog post, the next step is to select the source and target languages.
Specify ‘English’ as the language you are translating from. Then, choose ‘Ukrainian’ as the language you want to translate your blog post into.
Doctranslate supports a wide range of languages, ensuring accurate translation between English and Ukrainian.
Selecting the correct languages ensures that Doctranslate accurately translates your content.
Step 3: Customize Your Translation Settings
Doctranslate offers customization options to tailor the translation to your specific needs.
You can customize your translation by using features such as:
- Adjust the tone of the translation to be Serious, Formal, or any other preference.
- Define the domain of the content for more accurate terminology.
For document translations, utilize Doctranslate’s Translate Document feature and consider using ‘My Dictionary’ for specific terms.
These settings help refine the translation quality and ensure it aligns with your desired style and context.
Step 4: Review and Confirm
Before initiating the translation, it’s important to review your selected settings.
Double-check that you have chosen ‘English’ to ‘Ukrainian’ translation and customized any settings to your liking.
Ensure everything is set up correctly to get the best translation results from Doctranslate.
Once you are satisfied with your settings, proceed to the next step to start the translation process.
Step 5: Download, Share, or Export
After reviewing and confirming, click the “Translate Now” button to begin the translation process with Doctranslate.
Once the translation is complete, you will be able to access the translated Ukrainian version of your blog post.
You can then download the translated document to your computer for use on your blog or platform.
Doctranslate makes it easy to get your translated blog post ready for your Ukrainian audience.
Conclusion
Translating blog post from English to Ukrainian is now simple and efficient with Doctranslate. By following these five easy steps, you can easily make your blog content accessible to a Ukrainian-speaking audience.
Doctranslate streamlines the translation process, ensuring accuracy and saving you time. Start translating your blog posts today and broaden your global impact.
Don’t limit your content to just one language. Embrace the power of multilingual communication with Doctranslate and connect with readers worldwide.
Visit Doctranslate.io now to begin translating your blog posts and explore all the features designed to help you communicate globally.

Leave a Reply